Sunday, August 21, 2016

One Week Down, SALE, and Freebies!

I made it through the first week of school! Is that what you're thinking this year? Or are you still dreading that first week? Either way, you might be in the wrong place...and maybe not even know it!

This year, I am teaching art for the first time ever. After 20 years, I finally finished everything I needed to do to add art to my certification. And I moved classrooms. Again. It was AWFUL!!!
The room AFTER throwing a dumpster-full away!
Roach and mouse poop...EVERYWHERE!

At least I know what it is now!
The room I went into hadn't been cleaned out in over 20 years, but with lots of help, I got it all cleaned out and set it up my way. Then I went home and worried all summer. Was I doing the right thing? What if I didn't like it? What if I wanted to go back to second grade, or fourth, or any? But after one day, I knew. I couldn't stop smiling. It was like I'd won the lottery! I LOVE it! And now I know. After the first week, if you feel like you survived, you might need a drastic change, because I thought I loved teaching. And maybe I did, but, y'all, this is amazing! I practically skip down the halls. I have fun all day, every day. I'll take some pictures of the "after" this week!

I'm probably working harder than ever...all new lesson plans, no curriculum, just standards, weird supplies that I don't know how to use, and going from fifth graders to baby kindergarteners to TMD classes. I know, we all think the related arts teachers have it SO easy. We're wrong. They We get pulled in a million directions all day, every day. We have more hall duties, less lunch time, combined into planning, not both, more committees, and everyone comes to related arts teachers for ideas and favors. We're the first ones to fill in when a sub can't get there on time, and the custodians? They empty my trash. That's all. Meaning I clean my tables, I sweep my floor, I clean the sinks and wash the walls and make sure crayons don't get slid across the tile, jammed into the cracks, permanently. BUT, I love it! LOVE IT! I feel like, after all those years, I am finally doing what I was meant to do. It really is my #bestyearever!

Here's a FREEBIE for you, if you're a TPT seller: 

 
It's a sale banner, so if you're not a TPT seller, you know what that must mean...A SALE. Yep, it's tomorrow, one day only, site-wide, with up to 28% off. Use sale code OneDay to get the best pricing!

Now I have another freebie for all of you! It's the lesson I'm currently teaching in art, but it is all math-integrated, with some vocabulary and ELA, and a dash of self-esteem thrown in!
 
 
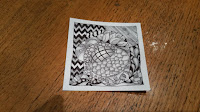
I know you've seen zentangles all over Pinterest, and in every book store and craft store known to mankind. They are pretty Zen, after all! This summer, I started fooling around with them and decided they were the perfect first lesson for all my art classes. They're easy to differentiate. You really can't "mess up". And they easily teach at least two of the elements of art, and can teach more. They tie in with math - think patterns, measurement, geometry, language arts - think vocabulary, and even social studies, if you want to explain Zen, as a religious practice. I'm using rectangular zentangles as covers for my students' sketchbooks. In art, this will be a three-part lesson. In the regular classroom, I'd just use parts one and two (if you even need part two). See the whole thing at my Teachers Pay Teachers store, but hurry! It's only free during the one day sale!

Have your #bestyearever and check back soon for more!

XOXO,
Brooke


Monday, August 8, 2016

It's official! I start back to school this week, and my children start middle school and high school next week. Where does the time go? It seems like just last summer they looked like this:

Now, there's makeup all over the bathroom counter, jewelry everywhere, and not a hairbow to be found anywhere! They're both excited, though, and so am I. I begin a new adventure in school this year, as well.

Since earning my masters' degree to teach, 20 years ago, I've wanted to teach art, but didn't have all the coursework I needed. Slowly and steadily I took classes to fulfill the art requirements, but still needed one more course, only offered in fall, only at one local college. My favorite bible verse is Jeremiah 29:11 "For I know the plans I have for you," said the Lord, "plans to prosper you and not to harm you. Plans for hope and a future." (NIV) Two years ago, my principal sent out an email asking if anyone was willing to have a student teacher, who just happened to need placement in fall, and just happened to go to that one local school that offers the course I needed. I emailed him back so fast, his head was probably spinning! God sent me the best student teacher ever...Larz. 


She's a teacher in the Myrtle Beach area now. My compensation from the college was a free class. So this past fall, I took my last class needed for art. In December, our art teacher retired. In March I took the Praxis exam, and passed. I sent in all my paperwork for certification, and after a long battle with the state department, over two classes I took years ago in Nebraska, I received not only my certification, but also a job offer at my own school!

This year, 20 years after starting my teaching career, I'll be a new teacher again, in ART, and I can't wait! 
www.finearttips.com
My goal, refined through so many years in the core curriculum classroom, is to incorporate as much of each grade level's core standards into art as I can. I hope to build background knowledge of classroom standards, as well as reinforce prior classroom teaching of grade-level standards. I have found so many incredible resources on Pinterest, and have so many new followers of my Artistic Pinspiration board. Whether you teach art or not, you can find tons of ideas here for incorporating art and craftivities into your lesson plans, or just to do for yourself, family, and friends, so come along for this wild ride, as we all go back to school, refreshed and ready to begin a new adventure!

I'm excited to continue to bring you new classroom products, as well as inspiration for your own arts incorporation. A peek at my new classroom is coming later this week. For now, get ready with this little give-away!

Follow my Artistic Pinspiration board for a chance to win a custom tee shirt just like mine! Let me know you're a new follower in the Rafflecopter below:


XOXO,
Brooke

Tuesday, August 2, 2016

Get Ready for Back to School!

Three Easy Ways to
Get Ready for Back 2 School

I don't know about you, but this time of summer makes me sweat. Not only the fact that it's 100 degrees with 45% humidity, but the thought of getting my girls and myself ready for back to school, really makes me sweat! If you're with me, give me a holla! Well, I've figured out three quick, fun, easy ways to at least get organized, if not mentally prepared.


"Polyvore" it Up!
My girls have more clothes than they know what to do with. Really. From Gramma's shopping sprees to hand-me-downs from cousins, to the "OH! I have to have that!" moments, they have so many pieces, but don't always know what goes together. Until I thought of this, they inevitably wore the same outfits over and over again and ended up looking like they had about 4 shirts, 1 pair of jeans, and a skirt or two. Now, they mix it up, match it up, and all the clothes get seen every once in a while. Here's how to make it fun and get them involved:
   First, clean out the dressers and closets. Yes, even that "dresser" under the bed! Okay, well, first, you might want to let your kiddos know the whole plan, or you'll never get this part done. While everything is out, get rid of the things they don't like or those that don't fit.
   Now, take photos of every top, bottom, accessory, and pair of shoes.
   This is where the fun begins. You can do this in PowerPoint, Publisher, or even Word. Choose one picture of a "bottom" and then go through all the "tops" to make outfit pictures. Add shoes, scarves, and other accessories, even jewelry. I usually do a warm weather and cool weather version with the same initial "bottom". Here's one:
The black and white striped skirt was where we started. Then we chose five summer tops, six winter tops, leggings (for winter under the skirt) and shoes. My girls love doing this!
   Last step is to print out the "Polyvore" pages you've made, and tape them to the inside of the closet door, back closet wall, or wherever you have room. There's no more, "I can't find anything to wear," or, "Honey, Mommy's really tired of that outfit...can't you find something else?"! Bonus: You can go ahead and pick out the perfect first day back outfit!


Personalize It!
     I know, it's not safe to have your kids' names all over their backpacks, lunchboxes, and clothes, but every mom and every teacher knows that every kid needs his name on every single thing. Here's my solution:  add a luggage tag to backpacks. You can find the cute single initial monogram ones just about anywhere, but, in case you're having trouble, click here. Now, you could just turn that little paper with room for address, etc. on it over and write on the back, or you can use these free editable labels. I'd go for easy, myself, and print out a bunch of labels at once! I've even used them on individual glue sticks, markers, and crayons!


     For everything else, as long as it goes inside the backpack, I think you're safe putting your kiddos' names on the item in large enough print to be easily recognized, and super cute! Grab some paint pens and Sharpies and label everything with your kids' names. Get creative, add some flowers, sports logos, or whatever your kids are into! Don't have beautiful handwriting? Cheat! That's right, cheat! Find a font you really like, type your child's name, size appropriate for the item you're personalizing, print it out, and either practice copying the name on scrap paper, or use Sharpie to trace the printed out name onto the item you're personalizing, then go over the Sharpie with paint pen. Trust me on this one...I used to work at a store where all we did was paint names on things! Bonus: Everything is labeled at once, and it all looks so cute!!!


Cook It Up!
     Have dinner ready for the first night you've gone back to school. Whaaa? Here's my favorite easy peasy recipe for chicken, rice, and broccoli casserole. Best part? You can prepare it in one pot and mix and bake it in one dish. Then just freeze it until your first day back.

Chicken, Rice & Broccoli Bake

1 rotisserie chicken, meat shredded, or 1 pkg. fresh chicken tenderloins, boiled until done and then    shredded
1 cup white or brown rice, cooked to equal 2 cups, as prepared
1 head of broccoli, cut into bite sized florets, or 1 12 oz. bag frozen broccoli florets
1 can cream of broccoli soup
1/2 c. mayonnaise
2 c. shredded cheddar cheese
3 oz. cheese crackers
2 T butter, melted

So, a little prep work...either buy your chicken pre-cooked, as in a rotisserie chicken, or simply boil fresh tenderloins for about 10 minutes, or until 165 degrees. Either way, shred the chicken with two forks. Cook your rice, according to package instructions. I use 1 cup of rice to 2 cups of water, bring it to a boil, lower the heat to simmer, adding a lid, and cook for 20 minutes. It comes out perfectly every time! Preheat your oven to 350 degrees. Once you have your chicken and rice ready, the rest is a breeze! Put everything, except the crackers and butter, right into a 9 x 13" baking dish. Mix all together. Crush cheese crackers - the kids can help with this part! If you're using these individual bags of crackers, like I do, snip a tiny edge at the top of the bag to let out the air. 

You won't spill any, and the crushing is much easier. Use a spoon to break up any large chunks.
Pour the cracker crumbs over the mixture in your dish, and drizzle the melted butter over the crackers. At this point, you can use freezer wrap to cover your dish for later, or pop it in the oven for 30 minutes. Everybody's happy with this one at my house!

Hope these tips make your back to school easier than ever.

XOXO,
Brooke